Ruby + Chrome’s coverage tool: Generate only used CSS (@media supported)
One of the issues I often face, whether I’m optimizing a page for performance or when gutting old pages is the need to get only the used CSS on a page. Chrome has a tool which can show you how much of your JS and CSS is “used,” which is tremendously helpful. It can tell you when your gratuitous 955 kB CSS file only has 1.5% coverage, meaning you could shave off 98.5% of that file, a huge win for your visitors on a data budget.
If you can download only the CSS rules that are applied to a page, you could create a “critical CSS” file, a technique for inlining only the CSS that applies to above-the-fold content and loading the full CSS file once the page is fully loaded. This technique makes your site appear to load instantly with no FOUC. Additionally, if you’re doing a major site redesign, it could be helpful to preserve the styling of legacy pages by including a legacy-only CSS file with absolutely no bloat. This avoids having a hoard of old CSS files (probably in a directory called “old”) where you’re too scared to delete anything for fear of breaking the pages.
I found the tool to be very helpful, especially when looking at CSS I never wrote. But a few things are lacking from this feature:
- No built-in way to download only the used CSS to a file.
- It doesn’t work across pages — it can’t tell you what CSS is used across your whole site.
- It doesn’t really know about rules within media queries unless they’re activated. This is likely by design. If you test the coverage of your page on mobile, it’s going to consider those rules inside desktop media queries unused.
@mediadeclarations are considered un-used.@font-facedeclarations are considered un-used.- The tool doesn’t know about all your dynamic content, obviously. If certain CSS is only activated after an AJAX call or
:hover, you need to activate each of those scenarios on the page, which can be tedious and intimidating.
Though these specific features are lacking, Chrome’s tool could save you arguably days of work if doing it by hand. When I discovered this tool, I figured hey, I can write a script to take care of the rest of my needs. The hard part is done!
This guide uses Ruby to fill in a few of the gaps mentioned above, and creates a workflow for generating that beautiful 99% coverage CSS file. It includes a little bit of manual intervention, but trust me, it’s pretty agreeable. I tried to make the script easy enough to follow so that you could implement a similar one in your language of choice.
There exists Chrome plugins which let you download the used CSS to a file, but when I checked this weekend (2020-06-13), each of the plugins that offered this feature had bad reviews, and weren’t able to get around the media queries problem. It was enough to make me decide to write it myself.
The basic concept here involves exporting the coverage as JSON, and parsing it to create a final CSS file containing only the used rules. Once the script is written, I’ll go over a workflow you can follow to bring this all together. Let’s get started!
Getting Ready
First we need to get a coverage file exported. I’m going to head over to one of my sites and pop open the Chrome inspector to see what the coverage is like. I’m going to:
- Open an inspector

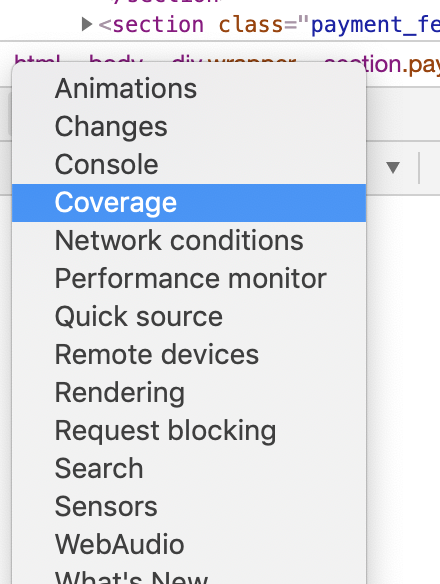
- With the elements tab open, and a console below, click the kebab menu to the right of the console and select “Coverage” to enable the panel.
- With the Coverage menu open, look for the refresh-looking icon next to the dropdown labeled “Per Function.”
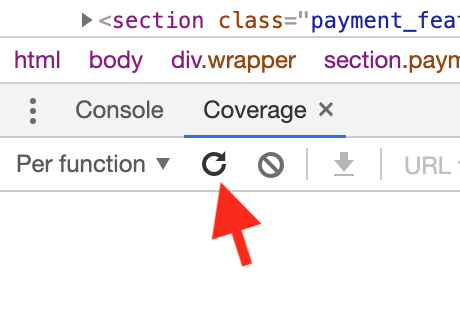
When you click this, Chrome will start recording code coverage. - Now it’s time to start playing around with your page to activate all the scenarios which would trigger CSS you know about. Resize the viewport to activate media queries. Hover over things you know have
:hoverrules. As you do this, Chrome will keep an account of what CSS is actually being used on the page. In that same Coverage menu, you can now see a list of files populate, ordered by most amount of “unused bytes.” For me, I’m looking at this file at the top which has 94.4% unused bytes:
DISSSSS-GUSTING!!! That’s a 312 kB file loaded on a page where I’m only using ~17 kB. For a site I built, I’d expect better! - I’m going to hit that Export button near where I started recording to start building my streamlined CSS file.
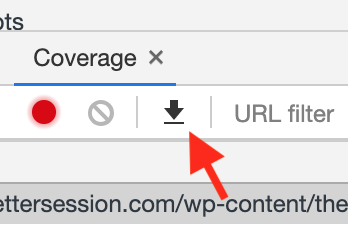
That will export a file I’m going to namecoverage.jsonto keep things simple. Place your file in a directory where you will create the Ruby script.
We now have what we need to start building the script.
The Script
When you export Chrome’s coverage as JSON, it’s going to include an array with references to each of the used files, a schema that looks like this:
{
  "url": "http://localhost:8080/assets/style.css",
  "ranges": [
    {
      "start": 26,
      "end": 49
    }
    ...
  ],
  "text": ".rule-a { color: blue; }n.rule-b { color: red; } ..."
}
Though it gives you the URL for the file, the fact that it gives you the entire file contents makes this even easier. We just need to loop through the ranges and use them to select snippets from the included text.
We’ll assume at this point that you have a file in the same directory called coverage.json. We’ll start by opening that file and looping through each CSS file in the list to extract the ranges from the contents.
require "json"
# Open a file in the same directory called only-used.css
File.open("only-used.css", "w") do |new_file|
  # Open `coverage.json` and parse it as JSON
  # Begin looping through the assets
  JSON.load(File.open("./coverage.json")).each do |file|
    # Skip the asset unless it has a CSS extension
    next unless File.extname(URI.parse(file["url"]).path) == ".css"
    # Begin looping through the ranges
    file["ranges"].each do |range|
      # Select the snippet within the text that contains used CSS
      snippet = file["text"][range["start"]...range["end"]]
      # Add it to the file
      new_file << "\n#{snippet.strip.gsub(/\s+/, " ")}"
    end
  end
end
I named this file extract.rb. Execute the file by running:
> ruby extract.rb
The above snippet will create a file in the same directory called only-used.css, which contains the rough draft of what we want. Right away, I can see my file contains valid CSS, but it doesn’t contain any media queries. Whoops! This is because Chrome currently doesn’t count media queries as “used” CSS. Well, that’s just like, their opinion … man. No bother. We can code around this drawback and write some RegEx to search for and capture the nearest media query where applicable, then prepend it to the correct rules. Let’s edit the script.
require "json"
# Open a file in the same directory called only-used.css
File.open("only-used.css", "w") do |new_file|
  # Open `coverage.json` and parse it as JSON
  # Begin looping through the assets
  JSON.load(File.open("./coverage.json")).each do |file|
    # Skip the asset unless it has a CSS extension
    next unless File.extname(URI.parse(file["url"]).path) == ".css"
    # Begin looping through the ranges
    file["ranges"].each do |range|
      snippet_start = range["start"]
      # Select the snippet within the text that contains used CSS
      snippet = file["text"][snippet_start...range["end"]]
      # Scan for a media rule in the text that is nearest to the beginning of the snippet
      nearest_media_rule = file["text"][0..range["start"]].to_enum(:scan, /(@media[^{]+{)/).map { Regexp.last_match }.last
      # If a media rule exists
      if nearest_media_rule
        # Record the end position
        media_rule_end = nearest_media_rule.end(0)
        # Record the actual media rule
        media_rule = file["text"][nearest_media_rule.begin(0)...media_rule_end]
        # With all the text from the end of the media rule to the start of the snippet
        media_to_snippet = file["text"][media_rule_end..snippet_start]
        # Look for open and close brackets. If there is an equal balance of
        # open and close brackets, we know this particular @media rule applies
        # to our snippet of used CSS
        if media_to_snippet.scan("{").count == media_to_snippet.scan("}").count
          # So let's append that media rule to the used CSS, along with a close bracket
          # at the end of the line.
          snippet = "#{media_rule} #{snippet} }"
        end
      end
      # Add it to the file
      new_file << "\n#{snippet.strip.gsub(/\s+/, " ")}"
    end
  end
end
Whoa now! Once we execute this script, I can see it’s now pulling in media queries that make sense. Check out the way it builds Bootstrap’s .container class.
.container{width:100%}
@media (min-width: 576px){ .container{max-width:540px} }
@media (min-width: 768px){ .container{max-width:720px} }
@media (min-width: 992px){ .container{max-width:960px} }
@media (min-width: 1200px){ .container{max-width:1140px} }
Not only does this make sense, but it teaches us a thing or two about Bootstrap’s organization. Yay media queries! Crisis averted!
Multi-page problem
Now a few of our problems from above have been solved, but what about when we want to test between pages? This is where some manual work is involved, and you’re not gonna like it. What I did in this scenario is ran a similar test-everything-on-the-page-then-export-a-file process on each page I knew to be unique. Since each page now has it’s own exported JSON file, I placed those into a directory called /coverages and set up a loop with Ruby to read the files sequentially:
require "json"
# Open a file in the same directory called only-used.css
open("only-used.css", "w") do |new_file|
  # Get the list of files in the `/coverages` directory
  Dir.foreach("./coverages") do |filename|
    # Skip if the file is not JSON
    next unless File.extname(filename) == ".json"
    # Open the file and parse it as JSON
    # Begin looping through the assets
    JSON.load(File.open("./coverages/#{filename}")).each do |file|
      # ... you know the rest
    end
  end
end
This will create a file that may have a LOT of duplicates, depending on how many pages you exported. The last step is to get rid of duplicate lines in the generated only-used.css file. The key is to keep the lines in order while removing duplicates. Don’t sort the lines alphabetically or you’ll totally lose the cascading nature of the original stylesheets. To do this, I just used a VSCode plugin for removing duplicate lines. It left the order alone. It worked like a charm and in the end I was left with only the used CSS across multiple pages.
Where it falls short
Chrome’s coverage tool doesn’t filter out unused selectors if part of a used rule. For example, when working with a CSS grid, you may have a selector that applies to all columns:
.col-1,
.col-2,
.col-3,
...
.col-12 {
  float: left;
}
If you happen to only be using .col-3, it’s not going to remove the rest of the .col-1, .col-2 and so on. In cases like this, it’s going to take manual intervention if you truly want to get rid of any unused selectors.
Relative assets in CSS aren’t guaranteed to be preserved. The coverage tool knows about which rules are used across multiple CSS files. If those files use relative asset urls such as:
/* File A */
.bg-thatched { background-image: url("../img/thatched.png"); }
/* File B */
.hero-header { background-image: url("../../img/hero.png"); }
Those rules will be looking in directories given their original layout, which may not be the same. My suggestion would be to not use relative assets, or at least put all the image assets in one directory so referencing is consistent between files.
Summary
I’m still really glad this tool exists, and I feel like a few extra lines in a script solved the majority of my problems. It would be nice to automate some of the testing with a tool like ChromeDriver, but I suggest you cross that bridge when you get there. For the purpose of exporting a single page or up to 10 pages, this should be sufficient.
Hi, thanks for the article. When I try to run the script I see this error: extract.rb:8:in `block (2 levels) in ‘: uninitialized constant URI (NameError)
Solved adding: require “uri”
Thanks again for the script, you literally saved my life !
Of course! I’m very glad you found this and that it helped you!